WHAT YOU’LL LEARN/SEARCH TITLES
- How to Update Project Progress from Excel to Primavera P6 | Step-by-Step Guide
- How to Import Contractor Progress into Primavera P6 from Excel | Simple Tutorial
- How to Sync Excel Data with Primavera P6 | Adding Contractor Progress to Master Schedule
- Effortlessly Update Project Progress from Excel to Primavera P6
- How to Manage Contractor Progress in Primavera P6 Using Excel | Complete Guide
- How to Update Master Schedule in Primavera P6 with Excel Contractor Progress
- Track Project Progress with Excel and Primavera P6 | Adding Contractor Updates Made Easy
- How to Import and Update Project Progress in Primavera P6 from Excel
- How to Add Multiple Contractors’ Progress in Primavera P6 Using Excel Data
- Step-by-Step: Updating Project Progress in Primavera P6 from Excel | Add Contractor Inputs
- How to Transfer Contractor Progress from Excel to Primavera P6 | Quick and Easy Steps
- Primavera P6 Master Schedule Update | How to Import Contractor Progress from Excel
- Excel to Primavera P6: How to Seamlessly Update Project and Contractor Progress
- Update Your Primavera P6 Project with Excel Data | Contractor Progress Integration Explained
- How to Efficiently Track and Update Contractor Progress in Primavera P6 from Excel
- How to Add Contractors Progress to Primavera P6 Using Excel
- How to Sync Contractor’s Progress in Primavera P6 from Excel
- How to Import Excel Data into Primavera P6
- How to import project progress data from Excel into Primavera P6.
- Step-by-step instructions on adding contractor progress into your project.
- Tips and tricks for syncing Excel data accurately with your Primavera P6 schedule.
- How to manage updates from multiple contractors seamlessly.
- Best practices for maintaining a consistent and accurate project timeline in Primavera P6
DESCRIPTION
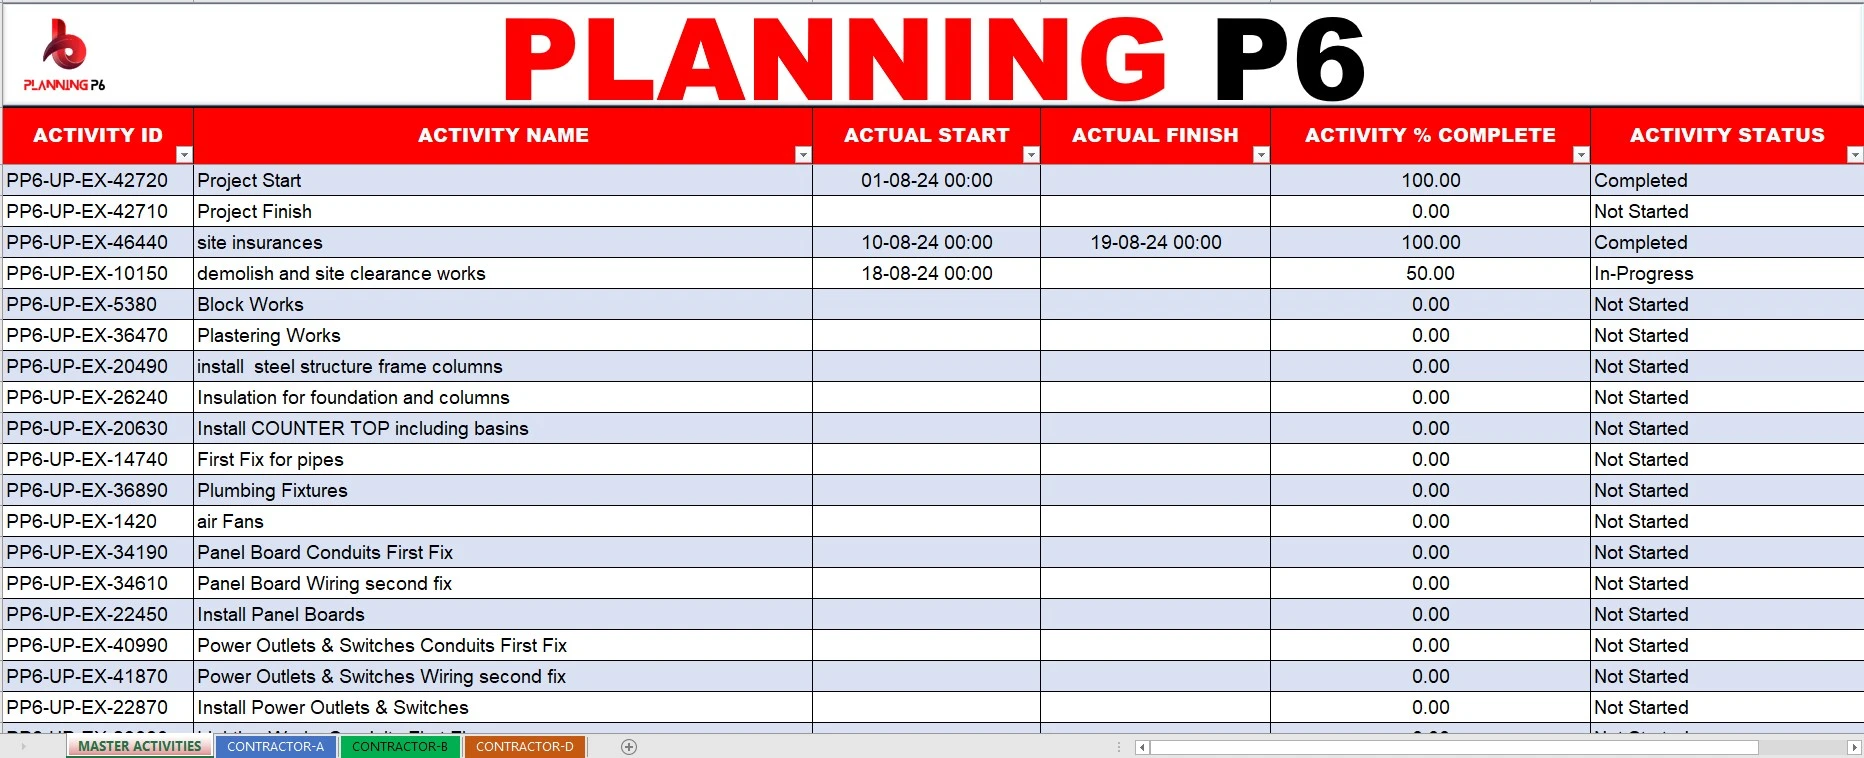
Hello, and welcome to Planning P6! I hope you’re doing well. In today’s blog post, I’m going to walk you through the process of updating progress from Excel to Primavera P6. While I’ve mentioned in previous tutorials that I generally don’t recommend using Excel to update schedules in Primavera P6, there are cases where this method becomes necessary—especially for large projects with thousands of activities. Some planners prefer this method because it helps manage large datasets more efficiently. In this guide, I will explain how to update your progress using Excel, the benefits of this approach, common errors you might encounter, and how to resolve them.
Before diving into the technical aspects, we recommend you check out our PlanningP6 YouTube Channel for detailed video tutorials and visual guides that complement this blog. Let’s get started!
PLANNINGP6 – EXCEL PROGRESS UPDATE SHEET
WHY USE EXCEL TO UPDATE PROGRESS?
I’ve prepared a sample file for this process where you can enter activity IDs, names, and other important details. The file contains formulas that automatically pull data from other sheets, which makes it easier to manage. If you have your own file, simply copy and paste the formulas and adjust the sheet and column names accordingly.
VIDEO TUTORIAL
HOW DOES IT WORK?
For example, I’ve updated a few activities from different contractors to demonstrate how it works. After the data is populated, you can clear any filters and proceed with importing the updated file into Primavera P6.
BENEFITS OF UPDATING PROGRESS FROM EXCEL
Flexibility: Excel allows you to customize your progress update file, adding specific columns for your project’s needs. You can manage contractor-specific data in one central location.
COMMON ERRORS DURING IMPORT AND HOW TO RESOLVE THEM
Resource Mismanagement: One of the biggest challenges is managing resources properly. During the import process, incorrect resource assignments or deleted resources can lead to errors. To avoid this, ensure that all resources are correctly assigned and up-to-date before importing data.
Missing or Incorrect Data: Sometimes, errors occur when certain required fields (like WBS codes, activity status, or activity IDs) are missing or incorrectly formatted. Always double-check that all mandatory fields are properly filled in and formatted before attempting to import.
Wrong Formatting: Incorrectly formatted Excel files (such as mismatched dates or percent values) can cause issues when importing into Primavera P6. Be sure to format your data correctly before attempting to import it.
Data Overwrites: If you’re not careful, data in your Primavera P6 project could be overwritten. To prevent this, always back up your project before importing any data.
Long Import Times: For very large projects, importing data can take a while. Be patient, and ensure your computer system can handle the file size and data import.
STEP-BY-STEP PROCESS OF IMPORTING DATA
Here’s the general workflow to import your updated Excel data into Primavera P6:
Export Data from Primavera P6: First, export your current project data to an Excel file. You’ll need to export the activity details, including WBS codes, activity IDs, and percent complete.
Update the Data in Excel: Open the exported file and update the relevant columns such as activity status, percent complete, and finish dates. You can update these for each contractor individually if needed.
Format the Data: Make sure your data is formatted correctly according to Primavera P6’s requirements. You might need to adjust the formatting for dates, percent values, or other fields.
Import the Updated Excel File into Primavera P6: Once the Excel file is ready, go back to Primavera P6 and import the updated file. Make sure to select the correct project and activity codes during the import process.
Verify the Data: After the import, check your project to ensure that all updates have been applied correctly. You should see updated activity statuses, percent complete, and other relevant details in Primavera P6.
IS THIS METHOD RECOMMENDED?
While updating progress via Excel can be a good solution for large projects, it is not the preferred method for all situations. I always recommend updating progress directly in Primavera P6, as it reduces the risk of errors. The manual update method within Primavera P6 ensures that resource assignments and other important project details are properly handled without the risk of accidental overwrites or mismanagement.
If your project is relatively small, or if you have the time and resources to update directly in Primavera P6, that would be the most reliable approach. However, for larger projects or when updates need to be made quickly, updating progress from Excel can be a useful tool.
CONCLUSION
Updating progress from Excel to Primavera P6 can be a helpful method for large projects, but it comes with its own set of challenges. By following the right procedures and ensuring that your data is correctly formatted and complete, you can avoid many common errors and streamline the progress update process. For smaller projects, I strongly recommend updating progress directly within Primavera P6 to avoid the issues that come with Excel imports.
If you found this tutorial helpful, feel free to like, share, and comment on it. Also, stay tuned for more upcoming tutorials on Primavera P6, including how to create dashboards and manage project progress with ease. Thanks for reading, and best of luck with your project planning!
ADDITIONAL RESOURCES
For a comprehensive understanding, we recommend exploring our dedicated tutorials on Primavera P6 relationships. These tutorials are accessible through our Planning P6 Tutorials Dictionary (REV-003). Simply search for keywords like “relationship” or “Primavera P6 integration” to access relevant content.
DISCUSSION TOPIC
Contribute And Get Valuable Insights & Share Your Knowledge with Others.

